4 Steps To Become a Pro Scheduler in DigiQuatics
If you’re already a DigiQuatics user, chances are good you’ve already used, and are a fan, of the scheduling module. It is one of the most helpful tools for scheduling that I’ve ever come across, and I’m sure many users feel the same. Even if you’re very familiar with the module and DigiQuatics in general, below you will find a few tips, and tricks that could make your life easier.
If you’re looking to use the Scheduling module for the first time, these tips for building your schedule are sure to make your life easier, whether you make your schedule weekly, monthly, or seasonally.
Scheduling in DigiQuatics Basics
Scheduling in DigiQuatics is one of the most helpful tools for aquatics supervisors and staff alike. It's accurate up to the minute and prevents over-hours issues. With the ease of subbing procedures, it can truly streamline your scheduling process and free you and your staff up for more important tasks. Before we can get into some of the tips lets take a quick look at the basics of how to enter your schedule.
The Views of Scheduling
One of the first things you’ll notice when you go to build your schedule is that in the top right corner there are a number of options for customizing your view.
You can select If you want to view the schedule as a single day, as a single week, or as a single month. Which view you choose is largely based around how you schedule your staff (weekly, monthly, or seasonally), but for most, the weekly view is the best option for scheduling. Even if you’re scheduling a month at a time, chances are most of your staff are going to have similar shifts each week for that month.
There is also the option to choose whether you want to view the schedule by shift, or by employee. If you view it by shift, DigiQuatics will automatically organize your schedule daily based on the time the shift starts and the position of the shift.
If you choose to view the schedule by employee, DigiQuatics will then list all your employees at the facility you’re scheduling. Below each employee is the number of hours they are scheduled for that week or day, as well as the number of weekly hours they’ve requested, and it’s all automatically updated, and calculated which each scheduled shift added, changed or removed. If you happen to schedule them over their weekly limit, the hours scheduled will highlight in pink to grab your attention.

Next to each employee's name will be the shifts they are scheduled on the day, or week, that you are viewing. Even if building your schedule doesn’t work for you in the employee view, it is an excellent way to view each staff members’ weekly schedule to double check hours, and scheduled shifts against their availability.
Creating / Updating / Deleting Shifts
Whether you’re in the Employee or Shift view of the Scheduling module, the process for inputting, editing, or deleting a shift is the same. We’ll start with inputting as the other pieces are simply a piece of inputting.
Creating Shifts
In order to input a shift you simply click on the blank space of a day where it says "Add Shift" when you hover. Make sure you’re next to the employee’s name you’re scheduling if in Employee view. From there a window will pop up with information for you to input for the new shift. Minimally, you will need to input the start time of the shift, the end time, the employee who will be scheduled for the shift (if you’re in the employee view, this part will be automatically selected for you based on the name you are creating the shift under), the location of the shift, and the position.

There is also a section for Notes, as well as a check box for “Repeat” which will provide further options about repeating the shift for any number of days in the week, or for a number of weeks. If you join shifts together in a repeating series, you can update some (or all) of them later at once if you need to! Note on repeated shifts: If you’re changing, or deleting repeated shifts, you’ll need to specify if you’re making those changes or deletions for that single instance of the shift, or for every recurrence. You can do this by clicking the triangle on the right of the button to delete, update or unpublish any shift.

Once all the information is registered you can save the shift.
Updating Shifts
In order to update a shift you can simply select the shift you would like to edit from whichever scheduling view you use, and the pop-up window you used to create the shift will appear, with a few changes and additions.
From here you can edit the shift however you like, changing the time(s), the location or the employee the shift is assigned to, and DigiQuatics will automatically update all the changes, as soon as you select “Update Shift”.

Deleting Shifts
In order to delete a shift you simply click on the shift you want to delete and at the bottom of the pop-up window select Delete Shift.

You can also delete shifts in bulk. In employee mode, in the dropdown next to each employee you can delete all of their shifts in the current view at one time. No matter what mode you are in you can clear the entire schedule view at once using the "trash can" icon in the top-right corner of the Scheduling page.
Publishing Shifts
Often times when you’re building a schedule you don’t want staff coming in and accessing everything until you’re done. For one thing, to make sure they don’t muck anything up by subbing for each other while you’re still building the schedule, but also because you may not have finalized everything yet.
Luckily, DigiQuatics scheduling has two "states" for all the shifts you schedule: published and unpublished.
The unpublished view displays your schedule as you’ve built it, but only to you, and to other users with admin access. From your employee's view, nothing will be displayed, until you publish your schedule, which in essence makes it viewable by your staff as well as your administrators.
You have the ability to publish shifts individually, day-by-day, or even for months at a time from the main scheduling page utilizing the "publish" button.
4 Steps To Become a Pro Scheduler in DigiQuatics
Now that we understand the basics of scheduling in DigiQuatics, let’s look at some helpful tips that will make building your schedule, as well as working with it afterwards, much easier. So lets dive right into it!
1. Schedule repeating shifts one a time (monthly & seasonal)
If you utilize the repeat function when creating or updating a shift, here is a helpful tip that will make any changes down the line much easier.
Let’s say you have employee "Suzie" who is working Mondays, Wednesdays and Fridays from 11am to 3pm. You could create a shift and select Monday, Wednesday, and Friday as days that the shift will repeat, and be done with it.
However, it could create issues later. If say after a week, employee X no longer wants to work the Wednesday shift but wants to keep the Monday and Friday shifts, you cannot edit only the Wednesday shift without editing the Monday and Friday shifts as well.
To avoid this problem, when utilizing the repeat function, it’s easiest to only utilize it for one shift, one day of the week, and repeat that for as many weeks as necessary. That way if a change happens you can adjust that singular shift easily. In this example, create a repeating shift for Suzie on Mondays from 11am to 3pm for the next 8 weeks. Then create another repeating shift for Suzie on Wednesdays from 11am to 3pm for the next 8 weeks and so on.
This tip is particularly helpful for users who schedule multiple months at a time. If you schedule one week at a time, or even one month at a time, it may not be an issue as you can simply edit shifts individually for that month.
2. Schedule your shifts with Consistency (All Schedule Types)
When viewing your schedule, it is best to break your daily schedule down into time slots that you fill in with staff, as opposed to scheduling staff for shifts of varying lengths starting and ending at varying times.
If your pool is open from 1pm to 6pm and you need 2 staff on at all times, and you’ve scheduled it like this: Employee A – 1pm-3pm, Employee B – 3pm-6pm, Employee C 1pm-4pm, Employee D 4pm-6pm your shift view on DigiQuatics will look somewhat jumbled and be more difficult for staff to read unless they’re looking at only their individual schedule. Instead, having set shifts (1-3pm, 3-6pm) and scheduling people within those times will help keep your schedule clean and easy to read.
Here is a quick video on how to create favorite shifts in DigiQuatics:
<iframe width="710" height="429" src="https://www.youtube.com/embed/WJ7GCwMp8vc" frameborder="0" allow="accelerometer; autoplay; encrypted-media; gyroscope; picture-in-picture" allowfullscreen></iframe>
This tip is particularly important to keep in mind if you have more than 2 staff members on duty at a time, otherwise your schedule can get extremely confusing to read in the shift view, which is important for building lifeguarding rotations and ensure your staff are present for their shifts.
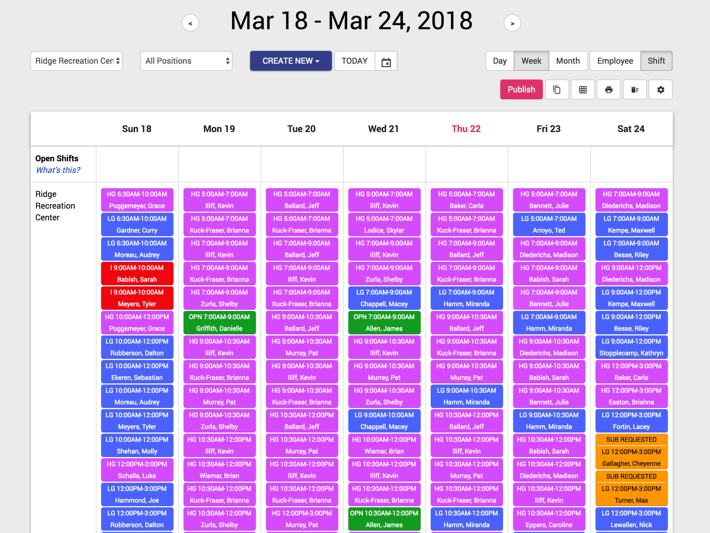
3. Color Code your Schedule (All Schedule Types)
One of the most important parts of scheduling is making it easy to read, and accessible by your staff. Aside from tip #2, it is important to make your schedule as easy to read as possible. One of the best ways to do that is to color code your positions.
Under the preferences (gear icon on the top bar) you can assign colors to each Position under your organization. Having distinct colors that separate your lifeguards from your head lifeguards is particularly important, as they are likely the ones who will be on the schedule the most. But it can be important to highlight other positions as needed, such as instructors (for swimming lessons), coaches for swim teams, or supervisors in general.

By giving separate colors to each position on your schedule you can further improve the readability, and make it easier for staff to know who they are working with or for that shift.
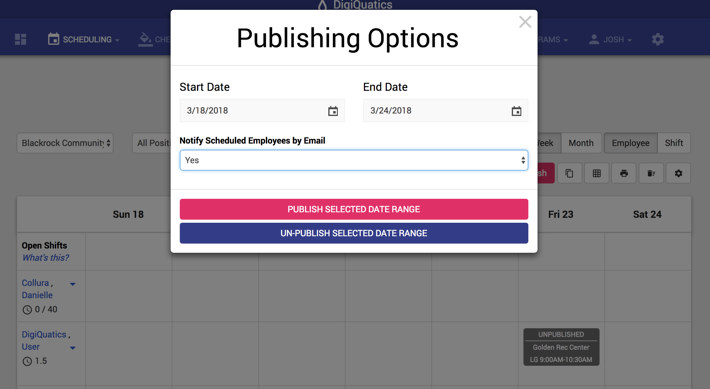
4. Utilize the Publish Feature (Weekly or Monthly Scheduling)
The publish feature is there not only to pick when your staff can see the schedule, it can also be used as a feature to make building your schedule easier.
If you’re building your schedule week-to-week or month-to-month, many people will have the same requests for weeks or even months at a time. Inputting shifts and having them repeat for weeks beyond what they’re requesting can save you a lot of time down the line.
Let’s say Employee Y is available 12pm-3pm on Mondays. You could input that shift week-by-week every time you build the schedule. Or, you can repeat it for the month (or however long), and by utilizing the publish feature you can plan your schedule four weeks in advance, but not finalize anything until it’s time. If you only publish one week at a time, your employees will get their schedule when it’s published and you are free to make changes, updates, and corrections for farther out in the future, as they come up, and the changes are saved into DigiQuatics, even if your staff can’t see them yet.
For more information on publishing your schedule with notifications, check out our blog posts on how to notify when publishing your schedule, and how DigiQuatics automatically alerts employees on changes to published shifts.
Conclusion
These are just some of the tips that can help make building your schedule even easier. If you have any other tips or comments about the Scheduling Module, we’d love to hear about them below in the comments!