Custom Checklists in Aquatics: The Digital Way
Are you tired of the endless binders of paperwork in aquatics and parks and recreation? Are your checklists either done without documentation, or better, but not perfect, completed and stuffed into a binder or filing cabinet somewhere? Don’t worry, there's a better way. Below we will go into detail about how to create a free Google account and manage all of your checklists digitally. Not only will you save time, energy, and paper, but you will become more organized at your aquatics operation. Before jumping into creating digital checklists, here are some examples to get the gears in your head moving:
Opening of pool or facility
Closing of pool or facility
AED logs
O2 or oxygen logs
First aid kit inspections
Sunscreen logs
Bathroom checks
General pool checklist
Pool inspection checklist
Model aquatic health code facility inspection
And more...
Using Google Forms
Creating your Google Account
The first place to start is to create a free account with Google. I recommend choosing a generic email for use at your organization and a password that can be shared with your management staff to access all your data. For example, [your-city].aquatics@gmail.com.
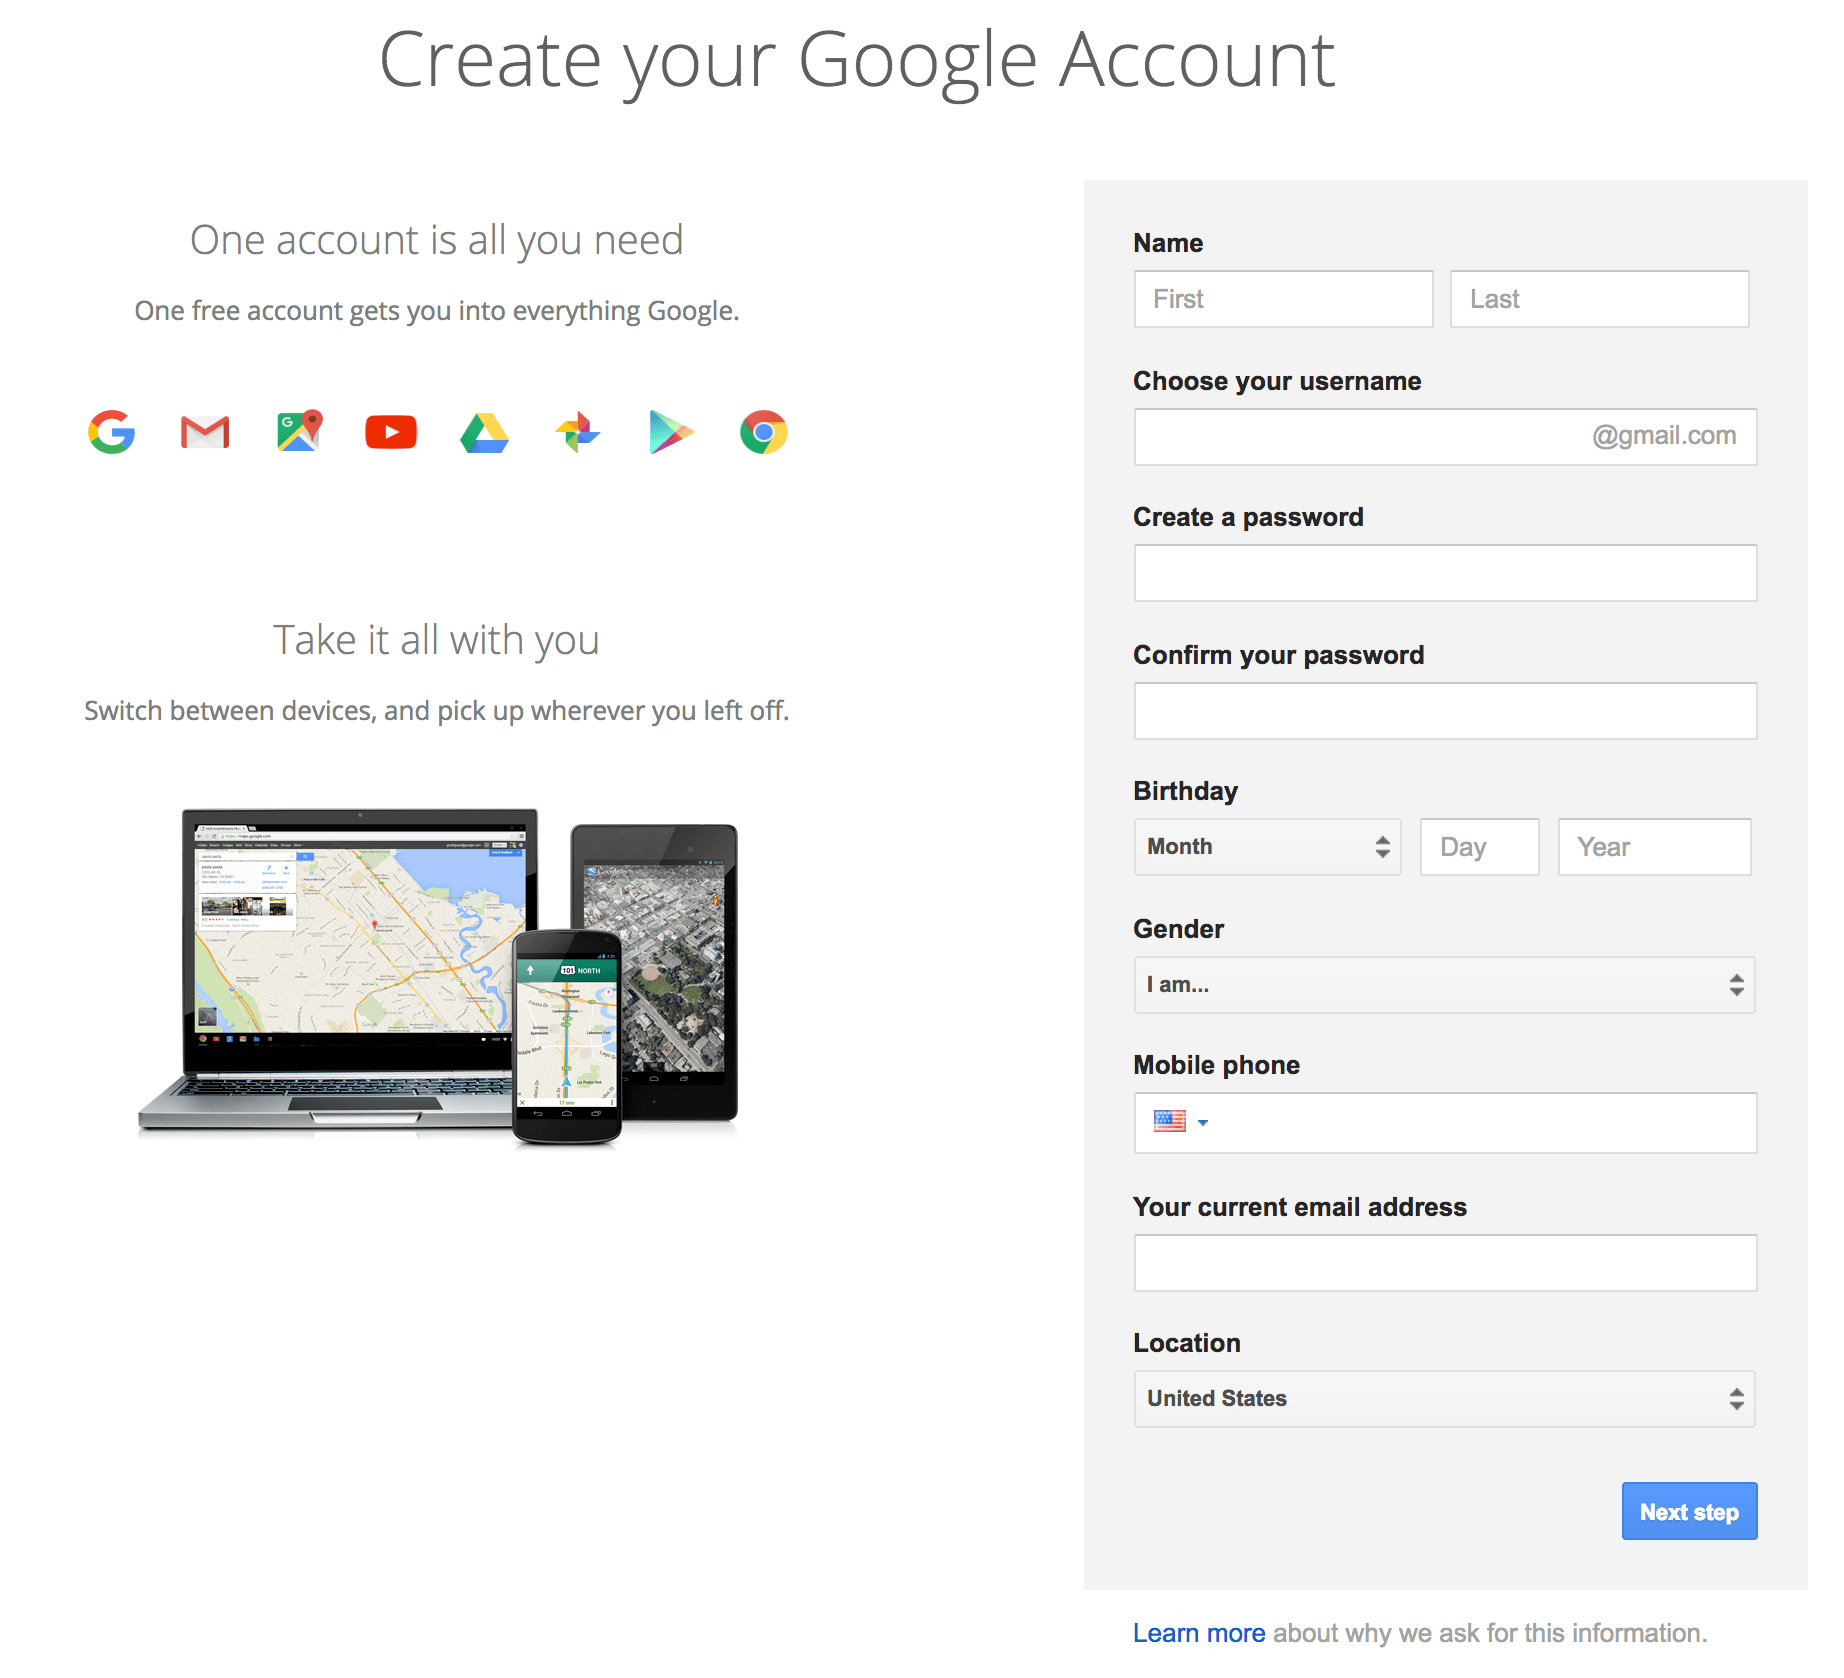
Once you created and login to your new Google account, click on the Google Suite Menu in the upper-right corner to access Google Drive. Google Drive is all of your documents in an online format, which includes Docs, Sheets, Slides, and of course Forms.

Next you will want to click the “New” button in the upper-left corner of your Google Drive screen. Under “More” select “Google Forms” to start your new form.

Next, you will want to title your form depending on the first checklist you want to get started with, I would suggest “Pool Opening Checklist” or something similar. Once your form is titled, you can start setting up all of your form “tasks.”
Go ahead and change the first form question type to “Multiple Choice”. This will be best for “Yes or No” type of tasks. To add another question to your Google Form, just click the “+” button the right side of your current question to add another. Hint: if you want to force the user to enter an answer you can switch the Required toggle to “on” which makes then at least put something in there before they can submit the form. Another great way to make new questions of a similar type to one already made is to use the “copy” button to duplicate your question.

To send the form to your staff, I recommend sending the unique form link via email to your staff so that they can just click on it and fill it out. This is a lot easier than trying to enter in all your staff email addresses into the recipients field in forms. To do this, just click the “Send” button at the top of the form builder and then click the “chain link” icon to get a unique link. I always use the “shorten link” button, just to take up less space.

Using DigiQuatics
First, you will want to go ahead and sign up for the free trial of DigiQuatics. To do this, visit and click the “Start Free Trial” button on the top right of the screen. You will need to do this on a desktop computer (To create the checklists), once created everything can be done via a mobile device. Go ahead and go through the onboarding steps to get started.
Creating your locations
Next, you will want to setup each of your locations that you want to submit checklists at. To do this, click the “Gear” icon in the top left of the navigation bar. This will take you to the account settings page. From here, go to the “Locations” Tab, and click the “Add Location” link. Go ahead and add each location you want to use for custom checklists.


Next, go to the “Checklists” tab, from here, find the location you want to create the first checklist for, and click the “Add a checklist” link.

Now you are ready to configure your first checklist. When you create a custom checklist in DigiQuatics you can choose which days you want the checklist to appear for staff. You can even set the priority of the checklist, this will make sure once you have multiple different checklists in DigiQuatics, the most important ones will appear at the top of the list for when staff goes to submit them.

Next, you will need to add the tasks for your checklist. Each task can be configured to show up on specific days. For example, you may have a cleaning checklist that has basic tasks such as “Clean the gutters”, or ‘Clean the guard office”, but you may want to have specific tasks occur less often than daily, such as “Vacuum the pool”.
Once you have all the tasks entered, just click the “Create Checklist” button to save your list.
So now what? Well, now that you have your first checklist created, you can access it on a daily basis from the dashboard page “square icons” in the top left of the navigation bar. The dashboard page is your “command center” in aquatics, it's where all the important notifications and tasks that need attention show up, as well as where you can access your checklists and see your recent pool chemistry, if you use those features in DigiQuatics. But don’t worry, you can choose exactly which features your organization needs in DigiQuatics.

Staff will be able to easily select the checklist that needs to be taken care of from here (on mobile or desktop).
The checklist tasks can be easily marked as completed, and the staff can add notes for their supervisors right on the form.

To manage all your checklists and see a complete history, you can go the the “Maintenance” tab in the navigation and select “Checklists” to see the completed list of all your checklists.

To view more details about a particular checklist, just click “View Checklist”.
The details page of the checklist will show which staff member completed which task, the time, and any other details.

Now that you know how to use custom checklists in DigiQuatics, here are some of the benefits you get over using a Google Form:
Each checklist has a unique time stamp
Tasks can be checked off on a task by task basis
Staff can comment on each task with notes about what they did, or problems they had
For every task that is marked off, DigiQuatics tracks which staff member did it, and when
Notifications of incomplete checklists (coming soon)
Checklists that occur on a non-daily basis such as “weekly”, “monthly”, “annually”, etc.. (coming soon)
If you have any questions whatsoever, about using DigiQuaics for custom checklists, be sure to reach out at team@digiquatics.com
Closing Remarks
Congratulations, you are now ready to move into the digital age with your facility or pools checklist. Whether or not you choose to use Google, DigiQuatics, or a similar solution to digitize your checklist process, you are well on your way to a much more organized operation. If you have any suggestions or ideas around better ways organizations can manage their checklists, please share below in the comments!